How to configure Bandwidth Control of TP-Link Wireless Dual Band 4G LTE Router (new logo)
The Bandwidth Control feature is used to fully utilize your limited bandwidth and optimize the load respectively. With this feature enabled, you can assign a specific minimum or maximum bandwidth for each computer, thus minimizing the impact caused when the connection is under heavy load.
I want to:
Use an independent bandwidth and enjoy a good internet experience without being affected by other users who are sharing the same router. For example, my roommate and I share 512Kbps Upstream Bandwidth and 4Mbps Downstream Bandwidth via this router, she likes to watch live show and play online games, which may take up much bandwidth. I don’t want to be affected, so we agree to equally distribute the bandwidth. The IP addresses of her computer and my computer are 192.168.1.101 and 192.168.1.100.
Tips:
To use the bandwidth control feature, you’d better set each computer to a static IP Address or configure Address Reservation on the router in order to manage it easily. About how to configure address reservation, please refer to How to configure Address Reservation of TP-Link Wireless Dual Band 4G LTE Router (new logo)?
How can I do that?
Here takes Archer MR200 as demonstration.
1. Please refer to How to log into the web-based management interface of TP-Link Wireless Dual Band 4G LTE Router? (new logo)
2. Go to Advanced > Bandwidth Control page.
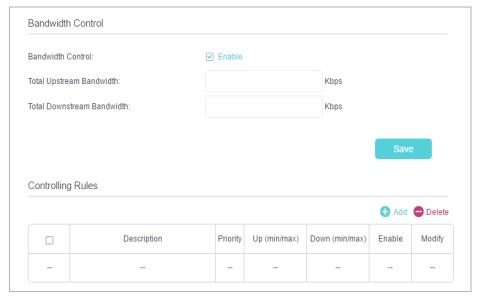
3. Enable Bandwidth Control.
4. Enter the Total Upstream Bandwidth and the Total Downstream Bandwidth given by your ISP. (1Mbps=1024kbps). Click Save to save the settings.
5. Click Add to add controlling rules for each computer respectively.
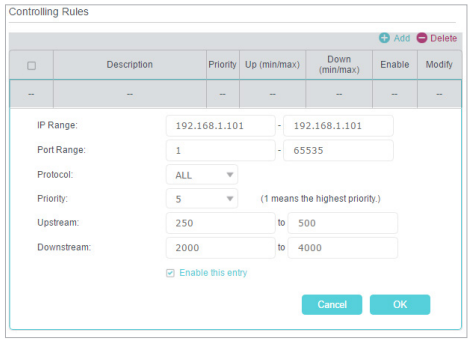
1) IP Range - Enter the IP address. The field can be single IP address or IP address range according to your demands. When you enter a single IP address, the computer with this IP address will get independent given bandwidth. When you enter an IP address range, all computers in the range will share the given bandwidth.
2) Port Range - Keep the default settings. The default port range of TCP protocol or UDP protocol is from 1 to 65535.
3) Protocol - Keep the default setting. Or you can choose the TCP protocol or UDP protocol or both of them.
4) Priority - Keep the default setting. You can change the value if you want to first guarantee the bandwidth for one computer. The smaller value has the higher priority.
5) Upstream/Downstream - Enter the bandwidth according to your division.
6) Check to enable this entry and click OK to save the settings.
6. Follow the steps above to add a rule for the other client device. And then you will get the following table.
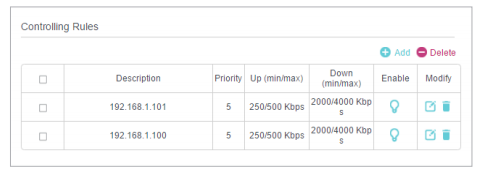
Now you and your roommate have an independent bandwidth.
Get to know more details of each function and configuration please go to Download Center to download the manual of your product.
Is this faq useful?
Your feedback helps improve this site.


TP-Link Community
Still need help? Search for answers, ask questions, and get help from TP-Link experts and other users around the world.