How to change the IP address of the smart and L2 managed switches using the new GUI and CLI
T1600G-18TS( V2 ) , T1500G-10PS( V2 ) , T1600G-28TS( V3 ) , T2600G-52TS( V2 ) , T1500-28PCT( V3 ) , T2600G-28TS( V2 ) , T2600G-28SQ( V1 ) , T1600G-28PS( V3 ) , T2600G-28MPS( V2 ) , T1500G-10MPS( V2 ) , T1600G-52PS( V3 ) , T1500G-8T( V2 ) , T1600G-52TS( V3 )
Recent updates may have expanded access to feature(s) discussed in this FAQ. Visit your product's support page, select the correct hardware version for your device and check either the Datasheet or the firmware section for the latest improvements added to your product.
In factory default setting, all the ports belong to VLAN 1, so you can access the switch using the IP address of VLAN 1, which is 192.168.0.1.
Therefore, if you need to change the IP address, you can just change the IP address of VLAN 1.
For Smart switches (T1500 and T1500G series switches)
● Using the GUI
- Go to SYSTEM > System Info > System IP, and configure the IP address of the switch.
- Click
to save the settings.
» Using the CLI
Follow these command lines to change the IP address:
Switch#configure
Switch(config)#interface vlan 1
Switch(config-if)#ip address 192.168.0.100 255.255.255.0
The connection will be interrupted and you should telnet to the switch's new IP address 192.168.0.100.
C:\Users\Administrator>telnet 192.168.0.100
User:admin
Password:admin
Switch>enable
Switch#copy running-config startup-config
For Managed switches (T1600G and T2600G series switches)
● Using the GUI
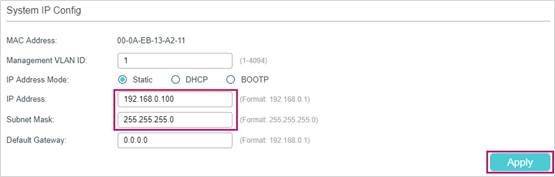
- Go to L3 FEATURES > Interface. In the Interface Config section, click Edit IPv4 for VLAN 1.
- The following interface will pop up. Configure the IP Address Mode as Static. Then enter the new IP address 192.168.0.100 and the subnet mask 255.255.255.0. Then click Apply.
- Click
to save the settings.
» Using the CLI
Follow these command lines to change the IP address:
Switch#configure
Switch(config)#interface vlan 1
Switch(config-if)#ip address 192.168.0.100 255.255.255.0
The connection will be interrupted and you should telnet to the switch's new IP address 192.168.0.100.
C:\Users\Administrator>telnet 192.168.0.100
User:admin
Password:admin
Switch>enable
Switch#copy running-config startup-config
Looking for More
Is this faq useful?
Your feedback helps improve this site.
What’s your concern with this article?
- Dissatisfied with product
- Too Complicated
- Confusing Title
- Does not apply to me
- Too Vague
- Other
Thank you
We appreciate your feedback.
Click here to contact TP-Link technical support.
Recommend Products
TP-Link Community
Still need help? Search for answers, ask questions, and get help from TP-Link experts and other users around the world.
This website uses cookies to improve website navigation, analyze online activities and have the best possible user experience on our website. You can object to the use of cookies at any time. You can find more information in our privacy policy .
Basic Cookies
These cookies are necessary for the website to function and cannot be deactivated in your systems.
TP-Link
SESSION, JSESSIONID, accepted_local_switcher, tp_privacy_base, tp_privacy_marketing, tp_smb-select-product_scence, tp_smb-select-product_scenceSimple, tp_smb-select-product_userChoice, tp_smb-select-product_userChoiceSimple, tp_smb-select-product_userInfo, tp_smb-select-product_userInfoSimple, tp_top-banner, tp_popup-bottom, tp_popup-center, tp_popup-right-middle, tp_popup-right-bottom, tp_productCategoryType
Youtube
id, VISITOR_INFO1_LIVE, LOGIN_INFO, SIDCC, SAPISID, APISID, SSID, SID, YSC, __Secure-1PSID, __Secure-1PAPISID, __Secure-1PSIDCC, __Secure-3PSID, __Secure-3PAPISID, __Secure-3PSIDCC, 1P_JAR, AEC, NID, OTZ
Zendesk
OptanonConsent, __cf_bm, __cfruid, _cfuvid, _help_center_session, _pendo___sg__.<container-id>, _pendo_meta.<container-id>, _pendo_visitorId.<container-id>, _zendesk_authenticated, _zendesk_cookie, _zendesk_session, _zendesk_shared_session, ajs_anonymous_id, cf_clearance
Analysis and Marketing Cookies
Analysis cookies enable us to analyze your activities on our website in order to improve and adapt the functionality of our website.
The marketing cookies can be set through our website by our advertising partners in order to create a profile of your interests and to show you relevant advertisements on other websites.
Google Analytics & Google Tag Manager
_gid, _ga_<container-id>, _ga, _gat_gtag_<container-id>
Google Ads & DoubleClick
test_cookie, _gcl_au