How to use VIGI cameras with other NVR brands or NAS

VIGI C400HP , VIGI C340HPWSM , VIGI C540HPWSM , InSight S345-4G , VIGI C540V , VIGI C540S , VIGI C250 , VIGI C450 , VIGI C330 , VIGI C330I , VIGI C455 , VIGI C440HWSM-W4 , VIGI C230I Mini , VIGI C580-W , InSight S655I , VIGI C340 , VIGI C540-4G , VIGI C340-W , VIGI C540 , VIGI C385 , VIGI C420 , VIGI C430I , VIGI C220I , VIGI C240I , VIGI C440-W , VIGI C540HWSM-W4 , InSight S445ZI , VIGI C340S , VIGI C540-W , VIGI C230 , VIGI C350 , VIGI C300P , VIGI C430 , VIGI C355 , InSight S345ZI , VIGI C320I , VIGI C340I , VIGI C580-4G , VIGI C420I , InSight S245ZI , VIGI C340HWSM-W4 , EasyCam C320 , VIGI C300HP , VIGI C340 (VIGI C340HPWSM) , VIGI C240 , VIGI C485 , VIGI C400P , VIGI C440 , VIGI C440I , VIGI C445 , VIGI C230I
Recent updates may have expanded access to feature(s) discussed in this FAQ. Visit your product's support page, select the correct hardware version for your device, and check either the Datasheet or the firmware section for the latest improvements added to your product. Please note that product availability varies by region, and certain models may not be available in your region.
The VIGI cameras work with VIGI NVR as well as other NVR brands or NAS for easier batch access and management. It is recommended to use the VIGI cameras with the VIGI NVR. For other NVR brands, make sure they support ONVIF and RTSP protocols. Here we will show you how to use VIGI cameras with other NVR brands.
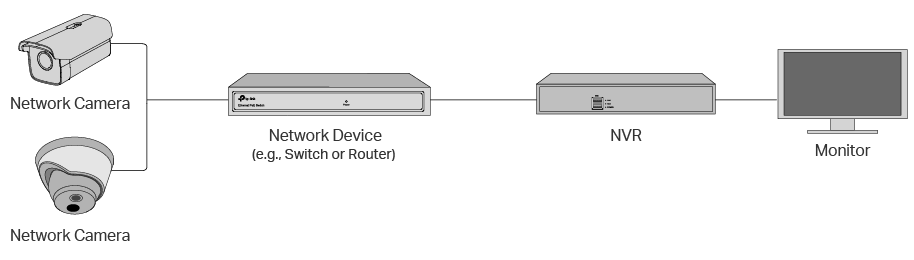
Step 1: Power on your cameras and connect them to the same network as your NVR.
Step 2: Activate the cameras using the VIGI Security Manager or VIGI App.
1. Download the VIGI Security Manager on your windows computer at https://www.tp-link.com/download-center/
2. Install the VIGI Security Manager and open it.
3. Go to Settings > Discovered Devices. Cameras on the same network as your computer can be automatically discovered.
4. Click + Add to activate your discovered cameras by setting passwords.
5. Follow the instructions to add your cameras.
Step 3: Refer to the NVR’s User Manual to add cameras.
We will show you some basic parameters that it may require to connect the VIGI camera to your NVR.
1. The IP address of the camera.
Open VIGI Security Manger and go to Settings > Device > Device List > My Devices > Settings icon of the camera > Network Settings > Connection.
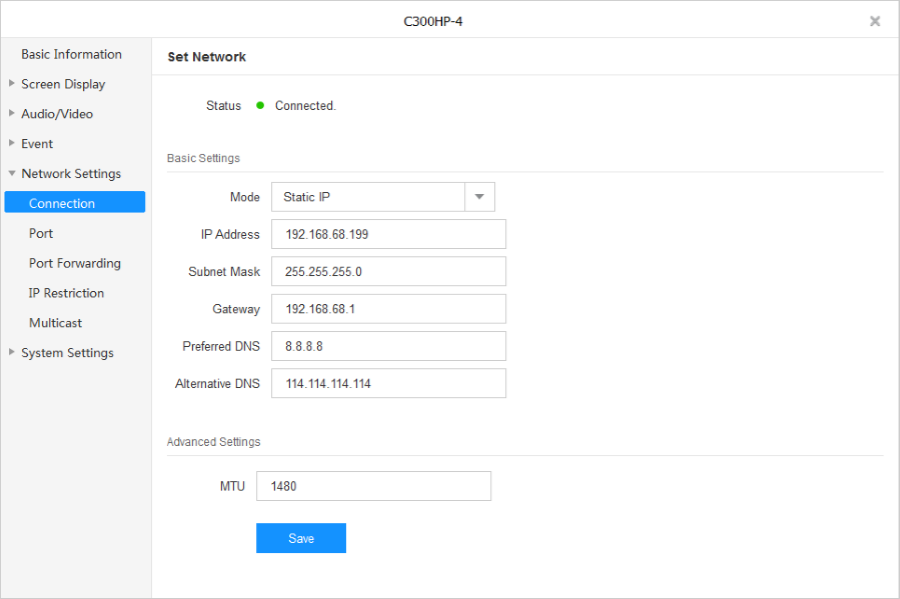
For some NVRs, you’ll need to modify the IP address of the VIGI camera to the same network segment as the NVR for successful adding.
2. The ports for standard ONVIF and RTSP protocols.
Please select Onvif protocols to add VIGI cameras.
ONVIF Service Port: 2020
RTSP Service Port: 554
3. The username/password of the camera.
Username: admin
Password: It is set when you activated the camera. If you forget it, please refer to the link to reset the password.
Get to know more details of each function and configuration please go to Download Center to download the manual of your product.
Είναι χρήσιμο αυτό το FAQ;
Τα σχόλιά σας συμβάλλουν στη βελτίωση αυτού του ιστότοπου.
What’s your concern with this article?
- Dissatisfied with product
- Too Complicated
- Confusing Title
- Does not apply to me
- Too Vague
- Other
Σας Ευχαριστούμε
Εκτιμούμε τα σχόλιά σας.
Κάντε κλικεδώ για να επικοινωνήσετε με την τεχνική υποστήριξη TP-Link.
Αυτός ο ιστότοπος χρησιμοποιεί cookies. Συνεχίζοντας την περιήγηση στον ιστότοπο, αποδέχεστε τις χρήσεις των cookies από εμάς. Μάθε περισσότερα.
Βασικά Cookies
Αυτά τα cookie είναι απαραίτητα για τη λειτουργία του ιστότοπου και δεν μπορούν να απενεργοποιηθούν στα συστήματά σας.
TP-Link
SESSION, JSESSIONID, accepted_local_switcher, tp_privacy_base, tp_privacy_marketing, tp_smb-select-product_scence, tp_smb-select-product_scenceSimple, tp_smb-select-product_userChoice, tp_smb-select-product_userChoiceSimple, tp_smb-select-product_userInfo, tp_smb-select-product_userInfoSimple, tp_top-banner, tp_popup-bottom, tp_popup-center, tp_popup-right-middle, tp_popup-right-bottom, tp_productCategoryType
Youtube
id, VISITOR_INFO1_LIVE, LOGIN_INFO, SIDCC, SAPISID, APISID, SSID, SID, YSC, __Secure-1PSID, __Secure-1PAPISID, __Secure-1PSIDCC, __Secure-3PSID, __Secure-3PAPISID, __Secure-3PSIDCC, 1P_JAR, AEC, NID, OTZ
Zendesk
OptanonConsent, __cf_bm, __cfruid, _cfuvid, _help_center_session, _pendo___sg__.<container-id>, _pendo_meta.<container-id>, _pendo_visitorId.<container-id>, _zendesk_authenticated, _zendesk_cookie, _zendesk_session, _zendesk_shared_session, ajs_anonymous_id, cf_clearance
Cookies Ανάλυσης και Μάρκετινγκ
Τα cookie ανάλυσης μας δίνουν τη δυνατότητα να αναλύσουμε τις δραστηριότητές σας στον ιστότοπό μας για να βελτιώσουμε και να προσαρμόσουμε τη λειτουργικότητα του ιστότοπού μας.
Τα διαφημιστικά cookie μπορούν να ρυθμιστούν μέσω του ιστότοπού μας από τους διαφημιστικούς μας συνεργάτες, προκειμένου να δημιουργήσουν ένα προφίλ των ενδιαφερόντων σας και να σας εμφανίζει σχετικές διαφημίσεις σε άλλους ιστότοπους.
Google Analytics & Google Tag Manager
_gid, _ga_<container-id>, _ga, _gat_gtag_<container-id>
Google Ads & DoubleClick
test_cookie, _gcl_au