How to configure VIGI camera's exposure parameters
VIGI C400HP , VIGI C340HPWSM , VIGI C540HPWSM , InSight S345-4G , VIGI C540V , VIGI C540S , VIGI C250 , VIGI C450 , VIGI C330 , VIGI C330I , VIGI C455 , VIGI C440HWSM-W4 , VIGI C230I Mini , VIGI C580-W , VIGI C340 , VIGI C540-4G , VIGI C340-W , VIGI C540 , VIGI C385 , VIGI C420 , VIGI C430I , VIGI C220I , VIGI C345 , VIGI C240I , VIGI C440-W , VIGI C540HWSM-W4 , InSight S445ZI , VIGI C340S , VIGI C540-W , VIGI C230 , VIGI C350 , VIGI C300P , VIGI C430 , VIGI C355 , InSight S345ZI , VIGI C320I , VIGI C340I , VIGI C580-4G , VIGI C420I , InSight S245ZI , VIGI C340HWSM-W4 , VIGI C300HP , VIGI C340 (VIGI C340HPWSM) , VIGI C240 , VIGI C485 , VIGI C400P , VIGI C440 , VIGI C440I , VIGI C445 , VIGI C230I
Οι πρόσφατες ενημερώσεις ενδέχεται να έχουν διευρυμένη πρόσβαση σε λειτουργίες που αναφέρονται σε αυτό το FAQ. Επισκεφτείτε τη σελίδα υποστήριξης του προϊόντος σας, επιλέξτε το σωστό hardware version για τη συσκευή σας και ελέγξτε είτε το datasheet είτε την ενότητα firmware για τις πιο πρόσφατες βελτιώσεις που προστέθηκαν στο προϊόν σας.
This article discusses how to adjust the exposure parameters of VIGI Cameras using the web interface or VIGI Security Manager to achieve better image quality in different environments.
Exposure refers to the amount of light entering the camera. Overexposure in surveillance images results in a too bright image, while underexposure leads to a dark image that lacks clarity.
Overexposure can generally be divided into overexposure during the day and overexposure at night. Overexposure during the day is mainly caused by backlighting in the scene, while overexposure at night is caused by excessive infrared reflection from objects.
Underexposure, on the other hand, is primarily due to low ambient brightness, resulting in insufficient light entering the camera.
To address the above issues, we can make adjustments through Exposure setting, Prevent Overexposure setting, as well as BLC (Backlight Compensation) and WDR (Wide Dynamic Range) settings to obtain more suitable image effects for specific scenes.
Exposure settings include exposure gain and shutter speed. Higher gain and slower shutter speed allow more light to enter the camera within the same time frame, resulting in a brighter image, and vice versa for a darker image.
Prevent overexposure, the brightness of the infrared illuminator can be adjusted to avoid excessive infrared reflection at night.
In addition, there are WDR settings and BLC settings. WDR processes the dark and bright areas of the image to make the dark areas brighter and the bright areas darker, thus achieving better image quality in environments with high contrast between highlights and shadows. BLC targets specific backlight areas and adjusts the light entering the camera accordingly to achieve the desired image effect.
Next, we will explain how to adjust these parameters through VIGI Security Manager and the camera's web interface.
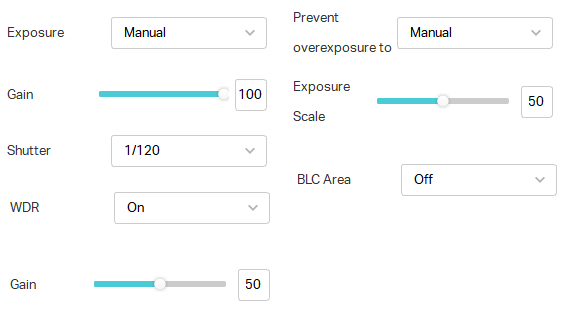
Configuring through VIGI Security Manager:
- Log in to the device list, click the gear-shaped settings button, and go to the camera's configuration interface.
- Select Display Information -> Image option, and then you can make adjustments to the aforementioned parameters.
Note: WDR and BLC are disabled by default, while exposure and overexposure prevention are set to auto by default.
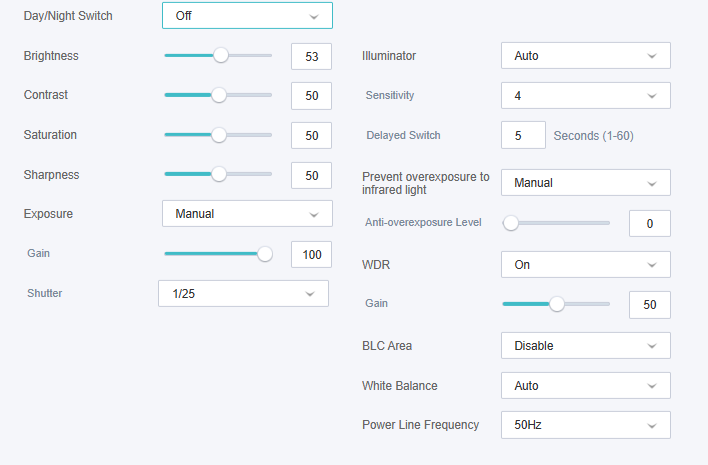
Configuring through the web interface:
- Log in to the device's management interface using the camera's IP address.
- Go to Setting -> Camera -> Display page, and make adjustments to the above-mentioned options.
Είναι χρήσιμο αυτό το FAQ;
Τα σχόλιά σας συμβάλλουν στη βελτίωση αυτού του ιστότοπου.
What’s your concern with this article?
- Dissatisfied with product
- Too Complicated
- Confusing Title
- Does not apply to me
- Too Vague
- Other
Σας Ευχαριστούμε
Εκτιμούμε τα σχόλιά σας.
Κάντε κλικεδώ για να επικοινωνήσετε με την τεχνική υποστήριξη TP-Link.
Αυτός ο ιστότοπος χρησιμοποιεί cookies. Συνεχίζοντας την περιήγηση στον ιστότοπο, αποδέχεστε τις χρήσεις των cookies από εμάς. Μάθε περισσότερα.
Βασικά Cookies
Αυτά τα cookie είναι απαραίτητα για τη λειτουργία του ιστότοπου και δεν μπορούν να απενεργοποιηθούν στα συστήματά σας.
TP-Link
SESSION, JSESSIONID, accepted_local_switcher, tp_privacy_base, tp_privacy_marketing, tp_smb-select-product_scence, tp_smb-select-product_scenceSimple, tp_smb-select-product_userChoice, tp_smb-select-product_userChoiceSimple, tp_smb-select-product_userInfo, tp_smb-select-product_userInfoSimple, tp_top-banner, tp_popup-bottom, tp_popup-center, tp_popup-right-middle, tp_popup-right-bottom, tp_productCategoryType
Youtube
id, VISITOR_INFO1_LIVE, LOGIN_INFO, SIDCC, SAPISID, APISID, SSID, SID, YSC, __Secure-1PSID, __Secure-1PAPISID, __Secure-1PSIDCC, __Secure-3PSID, __Secure-3PAPISID, __Secure-3PSIDCC, 1P_JAR, AEC, NID, OTZ
Zendesk
OptanonConsent, __cf_bm, __cfruid, _cfuvid, _help_center_session, _pendo___sg__.<container-id>, _pendo_meta.<container-id>, _pendo_visitorId.<container-id>, _zendesk_authenticated, _zendesk_cookie, _zendesk_session, _zendesk_shared_session, ajs_anonymous_id, cf_clearance
Cookies Ανάλυσης και Μάρκετινγκ
Τα cookie ανάλυσης μας δίνουν τη δυνατότητα να αναλύσουμε τις δραστηριότητές σας στον ιστότοπό μας για να βελτιώσουμε και να προσαρμόσουμε τη λειτουργικότητα του ιστότοπού μας.
Τα διαφημιστικά cookie μπορούν να ρυθμιστούν μέσω του ιστότοπού μας από τους διαφημιστικούς μας συνεργάτες, προκειμένου να δημιουργήσουν ένα προφίλ των ενδιαφερόντων σας και να σας εμφανίζει σχετικές διαφημίσεις σε άλλους ιστότοπους.
Google Analytics & Google Tag Manager
_gid, _ga_<container-id>, _ga, _gat_gtag_<container-id>
Google Ads & DoubleClick
test_cookie, _gcl_au