How to configure GreenBow IPsec VPN Client with a TP-Link VPN Router
This Article Applies to:
Configuring the TP-Link VPN Router
Step 1:
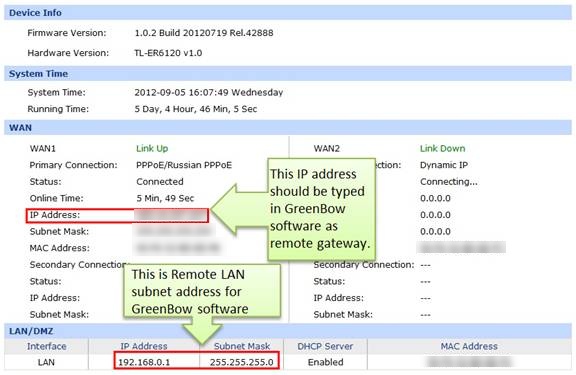
Access the router’s management web page, verify the settings needed on the router.

Step 2:
On the management webpage, click on VPN then IKE Proposal. Under IKE Proposal, enter Proposal Name whatever you like, select Authentication, Encryption and DH Group, we use MD5, 3DES, DH2 in this example.
.jpg)
Step 3:
Click on IKE Policy, enter Policy Name whatever you like, select Exchange Mode, in this example we use Main, select FQDN as ID Type and enter Local ID and Remote ID whatever you like, here we enter “1234” for Local ID and “4321” for Remote ID.
.jpg)
NOTE: NO matter on Main mode or Aggressive mode, once the client PC is behind a NAT device, we have to select FQDN as ID Type, otherwise the VPN tunnel can’t be established.
Step 4:
Under IKE Proposal 1, we select 1 in this example. Enter Pre-shared Key and SA Lifetime you want, DPD is disabled.
Step 5:
Click on IPsec on the left menu, then IPsec Proposal. Select Security Protocol, ESP Authentication and ESP Encryption you want to enable on VPN tunnel. Here we use ESP, MD5 and 3DES for example.
.png)
Step 6:
Click on IPsec Policy, enter Policy Name whatever you like, the Mode should be Client-to-LAN. Enter Local Subnet and select WAN port.
.jpg)
Step 7:
Look for Policy Mode and select IKE. Under IKE Policy, we select 123 which is used. Under IPsec Proposal, we use 123 in this example.
Step 8:
Look for PFS, we set NONE here, under SA Lifetime, enter “28800” or the period you want. Look for Status then select Activate.
Step 9:
Enable IPsec and then click on Save.
Configuring the GreenBow VPN Client
Step 1:
Right click on VPN Configuration and click on New Phrase 1.
.jpg)
Step 2:
Under Remote Gateway, enter the router’s WAN IP address, the Pre-shared Key should be the same with router’s, it is “123456”.on IKE section, the Encryption, Authentication and Key Group are the same with router’s, we use 3DES, MD5 and DH2 here.
.jpg)
Step 3:
Go to Advanced tab, select DNS as Type of ID, and then enter “4321” for Local ID and “1234” for Remote ID.
.jpg)
Step 4:
Right click on Phase 1, add a new phrase 2.
.jpg)
Step 5:
Enter remote LAN address and Subnet mask, in the example, the IP address is 192.168.0.0, Subnet mask is 255.255.255.0. Encryption and Authentication are the same with routers; we use 3DES and MD5 here. The Mode should be Tunnel.
.jpg)
Step 6:
Save the configuration and right click on Phrase 2(Tunnel), click on Open Tunnel.
.jpg)
Step 7:
If the client connect to the VPN Server successfully, you can see IPsec SA on the list.
.jpg)
Questa faq è utile?
Your feedback helps improve this site.


