Tapo T110_Setup Guide
Tapo T110 Setup Guide
Tapo T110 Smart Contact Sensor
Welcome to the setup guide.
To ensure equal access for all users, we offer this accessible setup guide. This guide is designed to meet accessibility needs, enabling a successful setup. It will introduce the appearance of your sensor and then guide you through the setup process.
Step 1. Know about your smart sensor
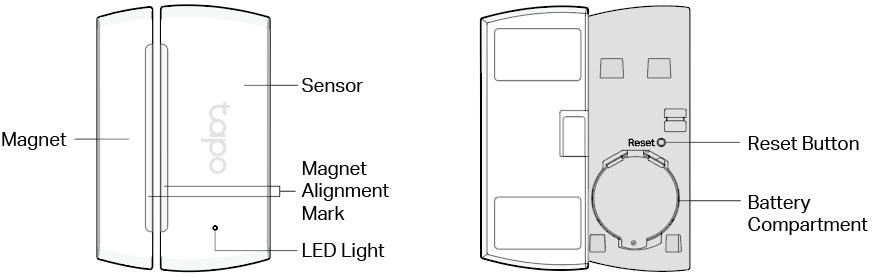
In this section, we will describe the sensor's appearance, including its button and label.
1. You can find your sensor and the 3M adhesive provided in the package.
2. Next, place the sensor on a flat, horizontal surface, like a shelf or desktop, ensuring the product's detection sensor (protruding part) and the LED are facing towards you.
3. After positioning your sensor correctly, we will introduce the device to you.
Sensor Detector: Located on the right side of the product.
Status LED: Located in the lower right corner of the product. It shows the sensor’s status.
Magnet: Located on the left side of the product.
Now, please turn the product around so the back faces you, and we will begin describing it.
Cover: Located on the back of the product. After removing the back cover, you can see the battery compartment and the reset button.
Reset Button: After removing the product's back cover, you will see the reset button (a small circular hole). Use a pin to press and hold the Reset button for 5 seconds to reset your sensor. Alternatively, you can remove the device in the Tapo app to reset your sensor.
Product "Label": The product label is through laser engraving on the back panel of your device.
Here we will introduce the other accessory in the package box:
3M adhesives: You can attach the included 3M adhesives to the back panel and position the sensor at your preferred location.
Step 2. Set Up
1. Get the Tapo app from the App Store or Google Play, then log in. Or you can visit https://www.tapo.com/app/download-app to download the Tapo app.

2. Power up your sensor. Wait 2 seconds for the sensor to start up.
3. Tap the + button in the app and select your device model. Follow the app instructions to complete the setup.
If you need help, please visit https://www.tapo.com/support/ for technical support, the user guide, FAQs, warranty & more.
For details on Tapo app accessibility, please check Accessibility Support.
English: Safety Information
Keep the device away from water, fire, humidity or hot environments.
Do not attempt to disassemble, repair, or modify the device. If you need service, please contact us.
Do not use the device where wireless devices are not allowed.
Please read and follow the above safety information when operating the device. We cannot guarantee that no accidents or damage will occur due to improper use of the device. Please use this product with care and operate at your own risk.
TP-Link hereby declares that the device is in compliance with the essential requirements and other relevant provisions of directives 2014/53/EU, 2011/65/EU and (EU) 2015/863.
The original EU declaration of conformity may be
found at https://www.tapo.com/en/support/ce/
TP-Link hereby declares that the device is in compliance with the essential requirements and other relevant provisions of the Radio Equipment Regulations 2017.
The original UK declaration of conformity may be found at
https://www.tapo.com/support/ukca/
For EU/UK Region:
Operating Frequency / Nominal Operating Frequency / Max Output Power:
863~865MHz / 863.35MHz / 25mW (e.r.p)
863~865MHz / 864.35MHz / 25mW (e.r.p)
868~868.6MHz / 868.35MHz / 25mW (e.r.p)
Warning
• INGESTION HAZARD: This product contains a button cell or coin battery.
• DEATH or serious injury can occur if ingested.
• A swallowed button cell or coin battery can cause Internal Chemical Burns in as little as 2 hours.
• KEEP new and used batteries OUT OF REACH of CHILDREN
• Seek immediate medical attention if a battery is suspected to be swallowed or inserted inside any part of the body.
• If the battery compartment does not close securely, stop using the product and keep it away from children.
Caution
Avoid replacement of a battery with an incorrect type that can defeat a safeguard.
Avoid disposal of a battery into fire or a hot oven, or mechanically crushing or cutting of a battery, that can result in an explosion.
Do not leave a battery in an extremely high temperature surrounding environment that can result in an explosion or the leakage of flammable liquid or gas; Do not leave a battery subjected to extremely low air pressure that may result in an explosion or the leakage of flammable liquid or gas.
Risk of explosion if the battery is replaced by an incorrect type.
a) Remove and immediately recycle or dispose of used batteries according to local regulations and keep away from children. Do NOT dispose of batteries in household trash or incinerate.
b) Even used batteries may cause severe injury or death.
c) Call a local poison control center for treatment information.
d) This product includes button/coin cell batteries of type CR2450.
e) The nominal voltage of the button/coin cell batteries is +3V.
f) Non-rechargeable batteries are not to be recharged.
g) Do not force discharge, recharge, disassemble, heat above 60°C/140°F or incinerate. Doing so may result in injury due to venting, leakage or explosion resulting in chemical burns.
Ensure the batteries are installed correctly according to polarity (+ and -).
Do not mix old and new batteries, different brands or types of batteries, such as alkaline, carbon-zinc, or rechargeable batteries.
Remove and immediately recycle or dispose of batteries from equipment not used for an extended period of time according to local regulations.
Always completely secure the battery compartment. If the battery compartment does not close securely, stop using the product, remove the batteries, and keep them away from children.