How to manage the switch with Mac via Micro USB cable
S5500-8MHP2XF , TL-SG3428MP , T3700G-52TQ , SX3008F , SG3428MP , SG3428X , T2600G-52TS , SG3452P , T2600G-18TS , T2600G-28SQ , TL-SG3210 , TL-SG3452 , SG3210 , SG3452 , TL-SX3008F , TL-SG3210XHP-M2 , S5500-24GP4XF , TL-SG3428 , SG3428XMP , SG3428 , TL-SG3452P , TL-SG3428XMP , TL-SG3428X , T3700G-28TQ
Recent updates may have expanded access to feature(s) discussed in this FAQ. Visit your product's support page, select the correct hardware version for your device and check either the Datasheet or the firmware section for the latest improvements added to your product.
In this article, we will share how to manage the switch and enter the BootUtil menu to reset or clear the password with Mac via a micro USB cable.
Step 1. Connect Mac to the switch.
Make sure your micro USB cable supports data transfer because some cables only support power supply. Then use it to connect your Mac to the switch.
Step 2. Use Terminal for management.
Go to “Launchpad”, search “Terminal”, then run it. Enter the following commands in Terminal to connect. Commands are listed in bold and italic.
ls /dev/*usb*
Then you will know the micro USB port used for terminal (tty) connection. Here the port is “/dev/tty.usbmodem141201”.
screen MICRO_USB_PORT 38400
Use screen command for connection, where 38400 indicates the bit rate. Here we should use “screen /dev/tty.usbmodem141201 38400” for connection. Don’t forget that the “Tab” key can help auto-completion.
Click the “Enter” key and a new screen will be displayed. Now you can manage the switch with CLI commands.
If you want to exit, press the “Ctrl” + “a” keys at the same time, then press “d” key to disconnect.
If you need to enter the BootUtil menu to reset the switch or clear the password, please continue below.
Step 3. Enter the BootUtil menu.
First, please complete the two steps above to ensure your Mac can communicate with the switch.
Then plug and unplug the power cord to reboot the switch. At the same time, you will notice that the switch screen will exit on its own because the switch is powered off and the USB connection is disconnected.
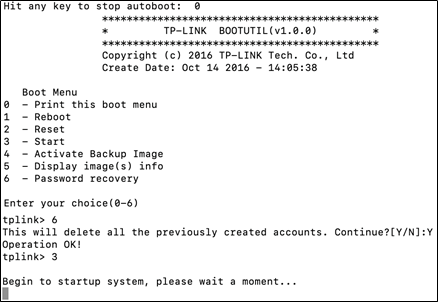
Be sure to note that press the up arrow key “↑” immediately and the “screen MICRO_USB_PORT 38400” command you typed before will be copied; then immediately press the “Enter” key to execute the command and a new CLI screen will be displayed. Keep clicking any key on the keyboard to stop the autoboot and you will enter the BootUtil menu.
Enter the number of the appropriate feature.
To factory reset the switch, type 2 then enter.
To recover the password, type 6 then enter.
Citește despre:
A fost util acest FAQ?
Părerea ta ne ajută să îmbunătățim acest site.
Ce probleme ai avut cu acest articol?
- Nemulțumit de produs
- Prea complicat
- Titlu confuz
- Nu se aplică pentru mine
- Prea vag
- Alt motiv
Mulțumim
Apreciem părerea ta.
Acest site web folosește cookie-uri pentru a îmbunătăți experiența navigării web, a analiza activitățile online și a oferi utilizatorilor cea mai bună experiență pe site-ul nostru. Te poți opune utilizării cookie-urilor în orice moment. Poți afla mai multe informații în politica de confidențialitate .
Cookie-uri de bază
Aceste cookie-uri sunt necesare pentru funcționarea site-ului web și nu pot fi dezactivate în sistemele tale
TP-Link
SESSION, JSESSIONID, accepted_local_switcher, tp_privacy_base, tp_privacy_marketing, tp_smb-select-product_scence, tp_smb-select-product_scenceSimple, tp_smb-select-product_userChoice, tp_smb-select-product_userChoiceSimple, tp_smb-select-product_userInfo, tp_smb-select-product_userInfoSimple, tp_top-banner, tp_popup-bottom, tp_popup-center, tp_popup-right-middle, tp_popup-right-bottom, tp_productCategoryType
Youtube
id, VISITOR_INFO1_LIVE, LOGIN_INFO, SIDCC, SAPISID, APISID, SSID, SID, YSC, __Secure-1PSID, __Secure-1PAPISID, __Secure-1PSIDCC, __Secure-3PSID, __Secure-3PAPISID, __Secure-3PSIDCC, 1P_JAR, AEC, NID, OTZ
Zendesk
OptanonConsent, __cf_bm, __cfruid, _cfuvid, _help_center_session, _pendo___sg__.<container-id>, _pendo_meta.<container-id>, _pendo_visitorId.<container-id>, _zendesk_authenticated, _zendesk_cookie, _zendesk_session, _zendesk_shared_session, ajs_anonymous_id, cf_clearance
Cookie-uri de analiză și marketing
Cookie-urile de analiză ne permit să analizăm activitățile tale de pe site-ul nostru web a îmbunătăți și ajusta funcționalitatea site-ului.
Cookie-urile de marketing pot fi setate prin intermediul site-ului nostru web de către partenerii noștri publicitari pentru a crea un profilul intereselor tale și a-ți afișeze reclame relevante pe alte site-uri web.
Google Analytics, Google Tag Manager
_gid, _ga_<container-id>, _ga, _gat_gtag_<container-id>
Google Ads și DoubleClick
test_cookie, _gcl_au