How to connect an Alarm device or Audio device to VIGI Camera
Contents
Objective
This article provides a step-by-step guide on how to connect an Alarm device or Audio device to a VIGI Camera
Requirements
- VIGI Camera (with an alarm/audio interface, )
Introduction
This article applies to VIGI cameras equipped with an alarm/audio interface.
Commonly used external alarms and audio equipment include:
|
Type |
Role |
Common Devices |
|
Audio In |
Used for sound collection |
microphone, pickup |
|
Audio Out |
Used for sound output |
speakers, subwoofers, loudspeakers |
|
Alarm In |
Built-in sensors detect environmental abnormalities and provide abnormal signals |
smoke detectors, infrared detectors |
|
Alarm Out |
After receiving the alarm signal, it alerts the user |
buzzer, alarm light |
This article will describe how to connect the above external alarm/audio devices to the VIGI camera.
Hardware Installation
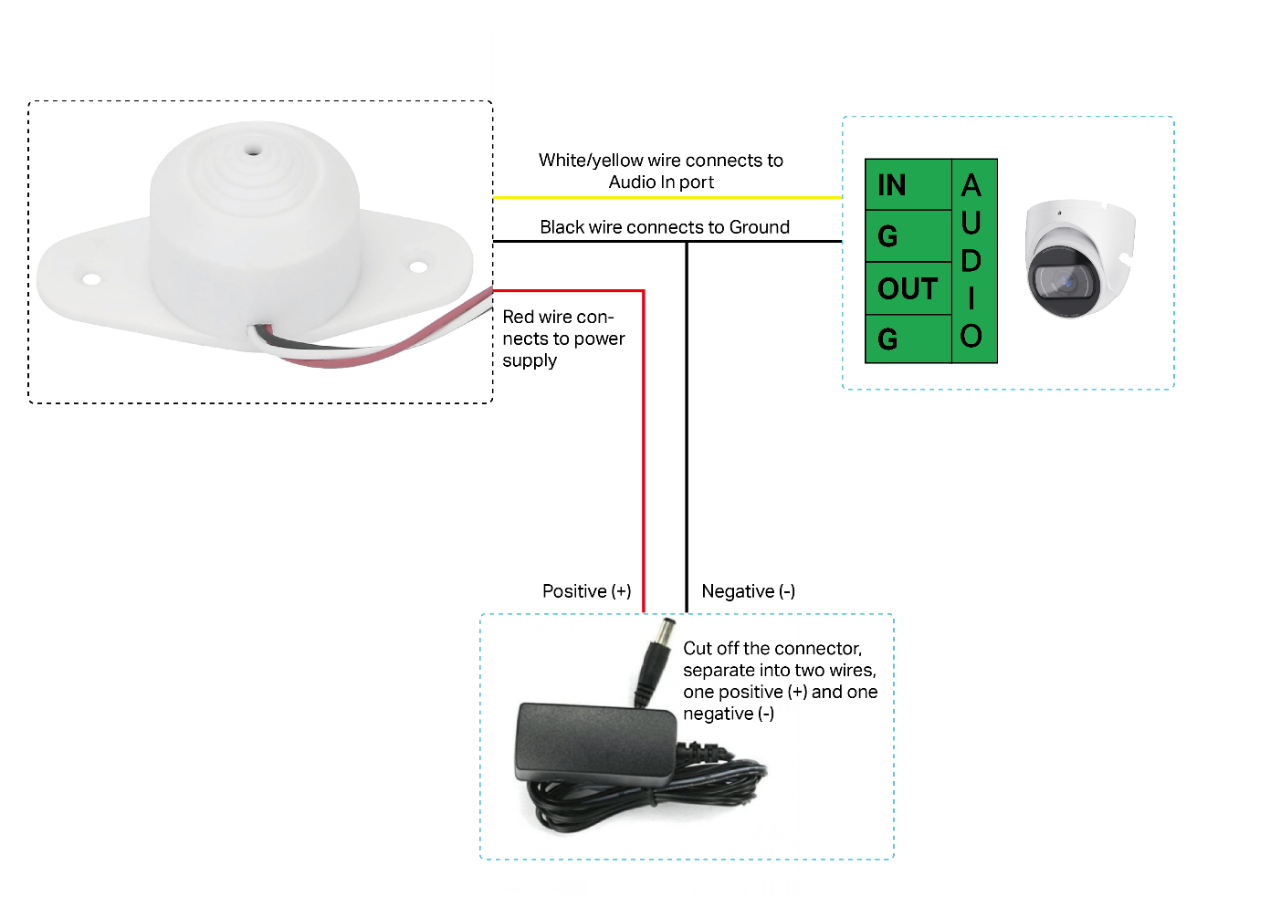
1.1 Connect the Audio In device (using a microphone as an example)
- 3-wire system microphone for CCTV camera
Refer to the following diagram for the connection:
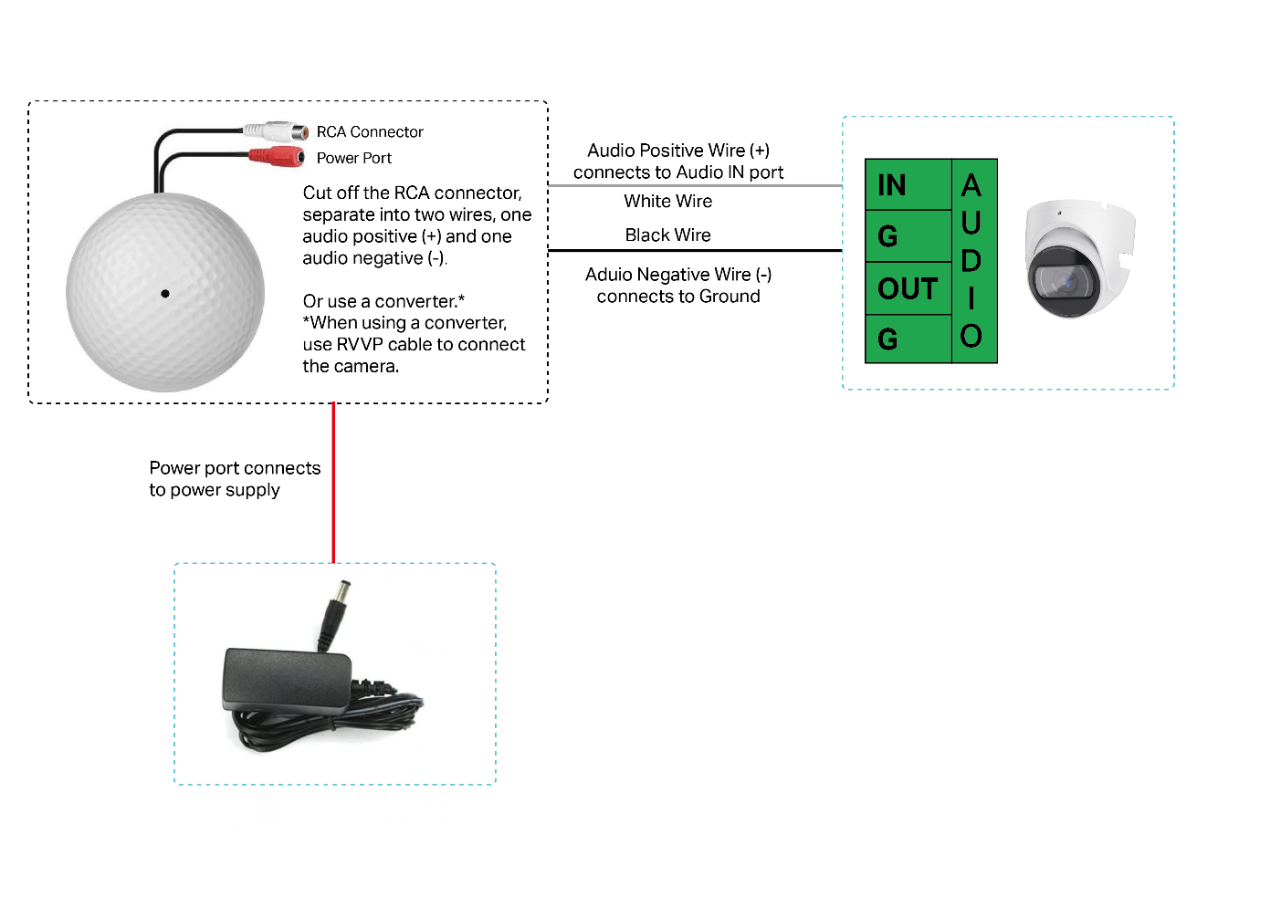
- Microphone with RCA connector
Some microphones have dedicated interfaces for power and audio, which are pre-made connectors. Refer to the following diagram for the connection:
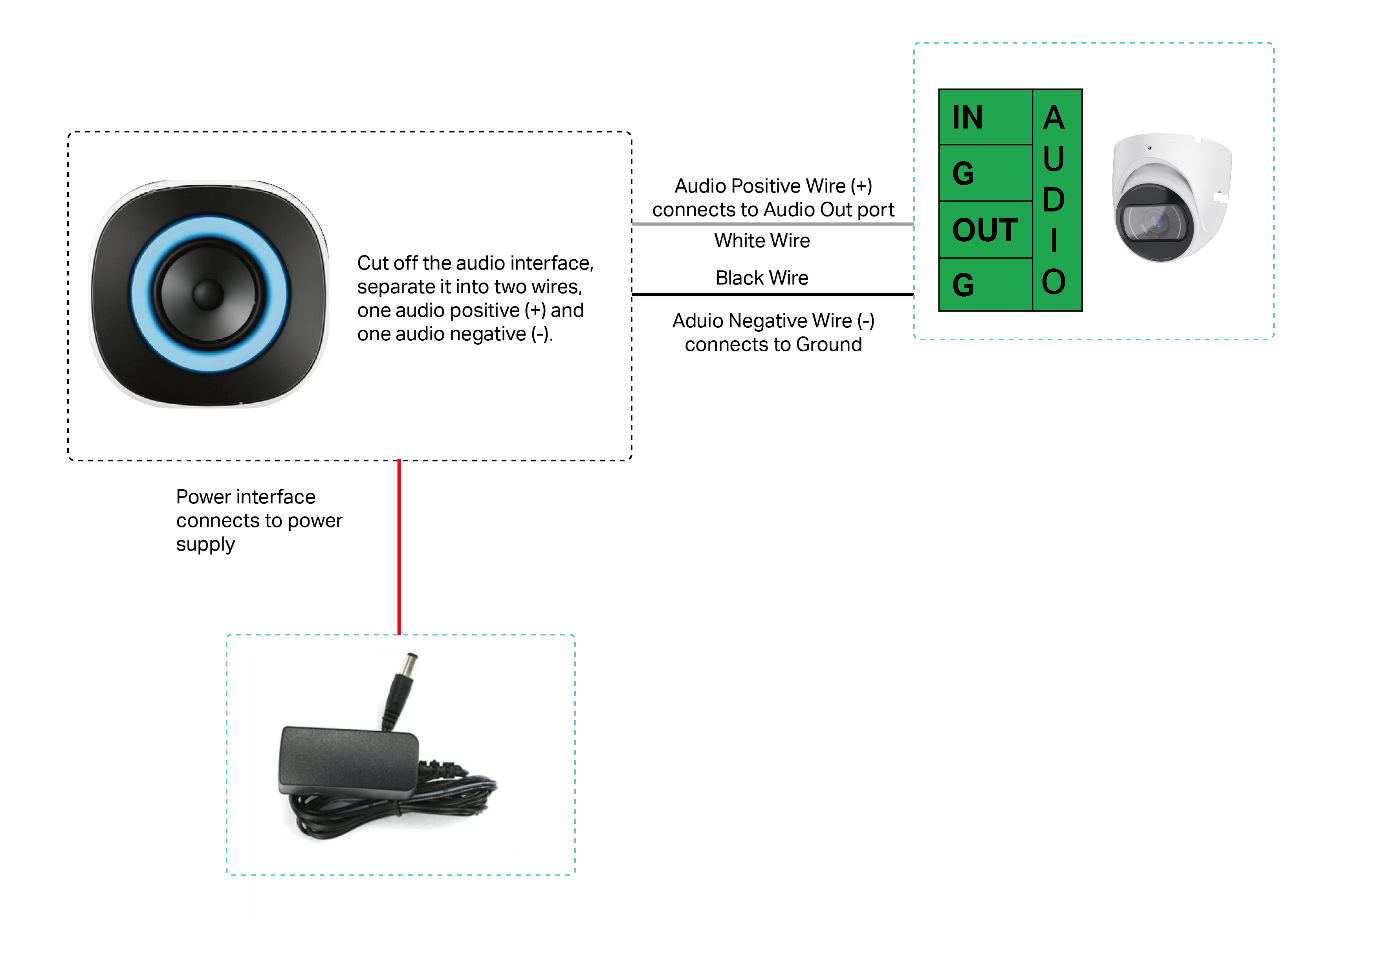
1.2 Connect the Audio Out device (using a speaker as an example)
Refer to the following diagram for the connection:
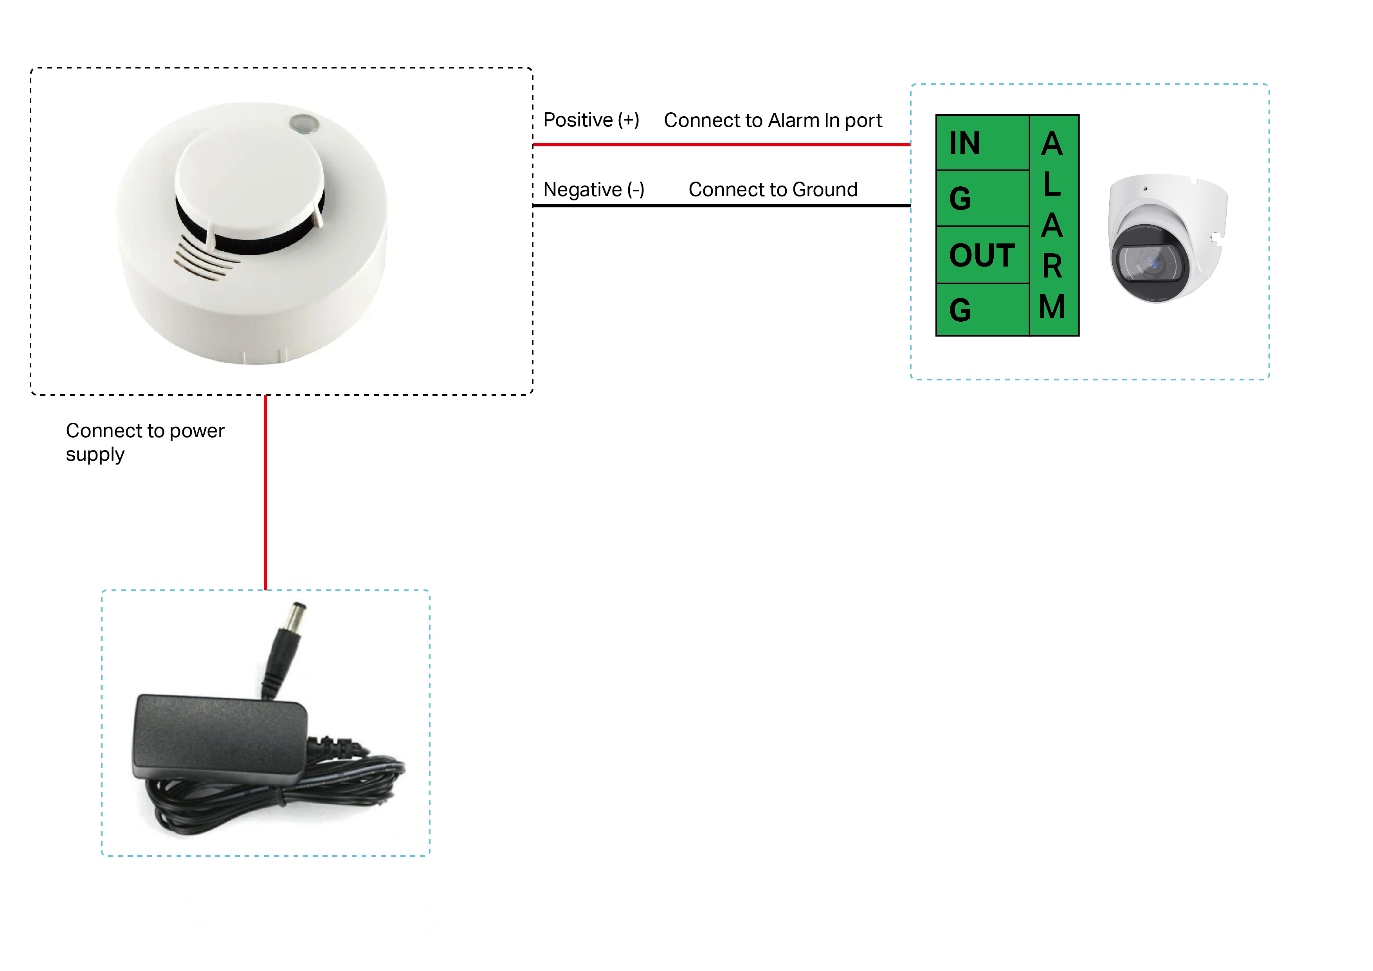
1.3 Connect the Alarm In device (using a smoke sensor as an example)
When an external alarm device detects an abnormal situation, it sends a signal to notify the camera, which then immediately takes corresponding measures to address it. There are various types of commonly used external detectors, such as sensors for sound, infrared, smoke, etc., which are connected to the Alarm In port of the device. Using a smoke sensor as an example, the connection diagram is as follows:
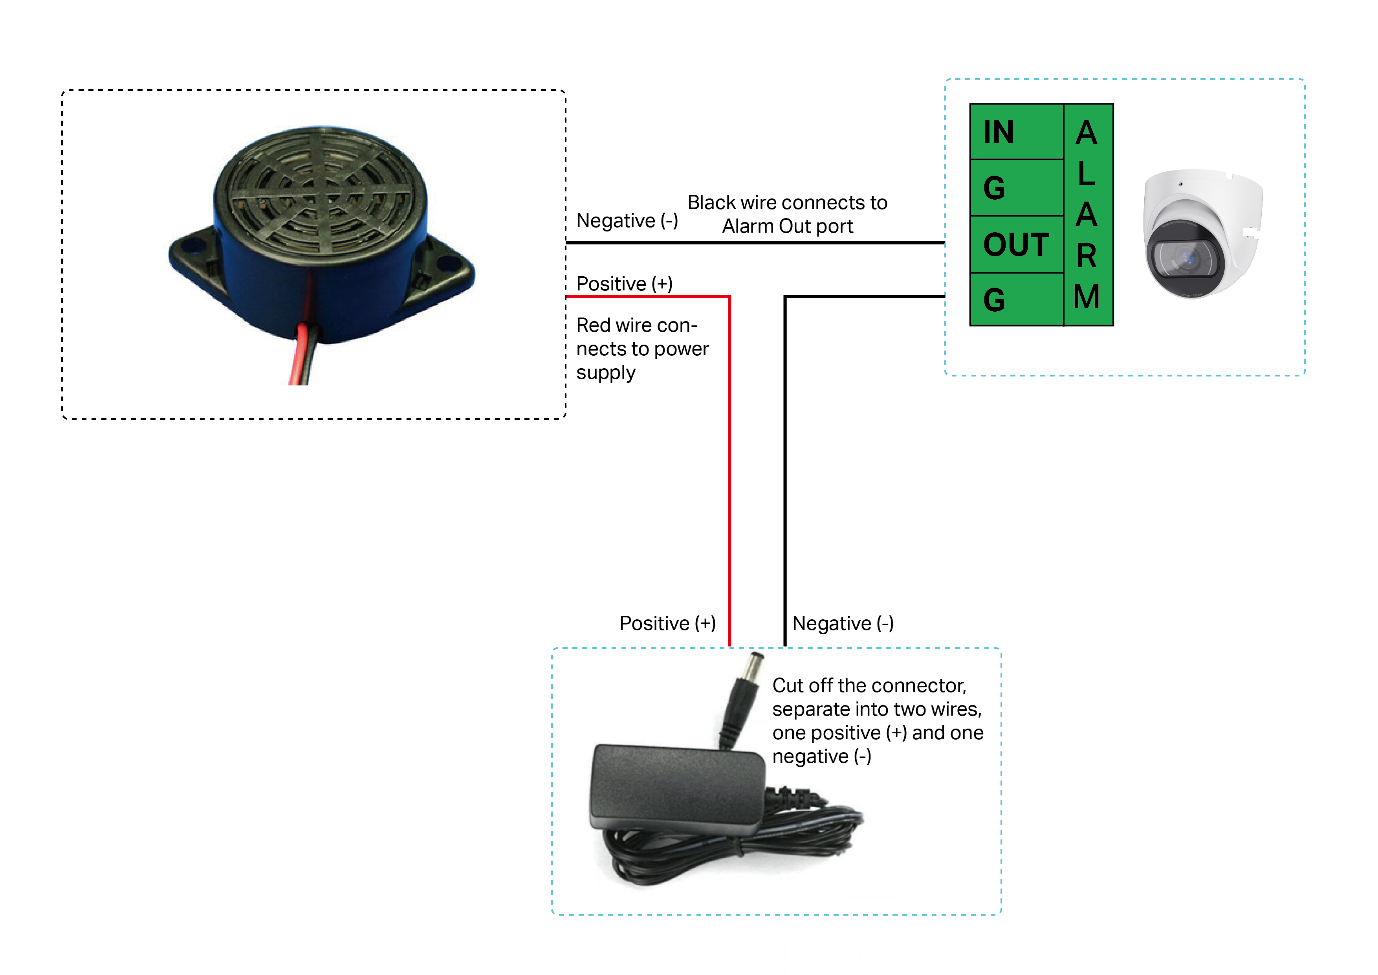
1.4 Connect the Alarm Out device (using a buzzer as an example)
VIGI devices can trigger alarms through external devices such as alarm lights, sirens, buzzers, etc. These alarm devices are connected to the camera’s Alarm Out port. Using a buzzer as an example, the connection diagram is as follows:
Configuration
After connecting the external audio/alarm devices to the VIGI Camera, we need to configure audio/alarm device on the Camera Web interface. The following configuration uses the settings page of InSight S345ZI as an example.
2.1 Configuration of Audio device
Follow the steps below to configure Audio settings.
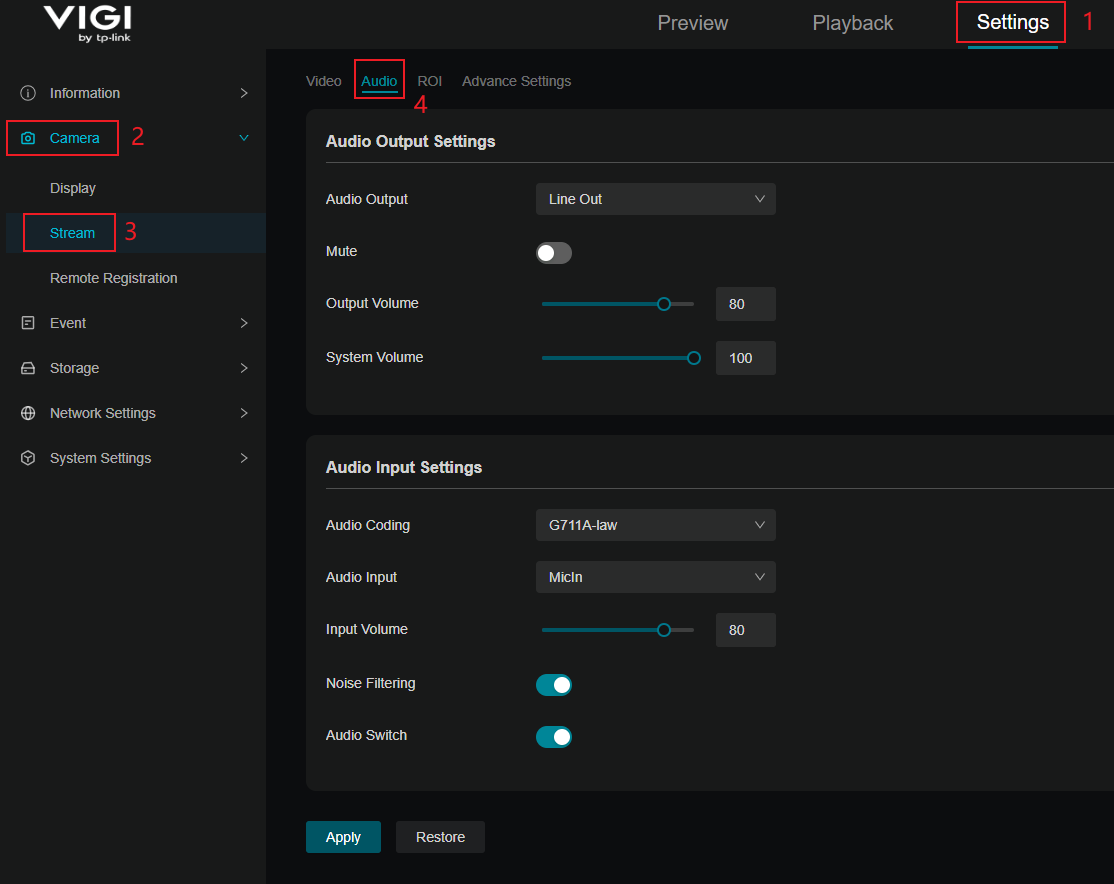
Step 1. Go to Settings > Camera > Stream > Audio.
Step 2. Configure the following parameters and click save.
- Audio Output: Speaker Out refers to the built-in speaker (the default setting), while Line Out refers to the external speaker (S345ZI just has an external speaker interface).
- Mute: Toggle to mute the speaker of the camera. It’s enabled by default.
- Output Volume: the volume of the speaker during the two-way audio.
- System Volume: the volume of the sound alarm and other system prompt tones.
- Audio Coding: Select the encoding type of audio.
- Audio Input: Select audio input device. Micin refers to the built-in microphone (the default setting), While Line in refers to external audio device.
- Input Volume: Adjust the volume of the input device.
- Noise Filtering: Enable noise filtering to remove the noise from the video. It’s enabled by default.
- Audio Switch: Turn on the microphone. It’s enabled by default.
- Restore: Click to restore to factory default settings.
2.2 Configuration of Alarm device
Follow the steps below to configure Alarm device settings.
Alarm input
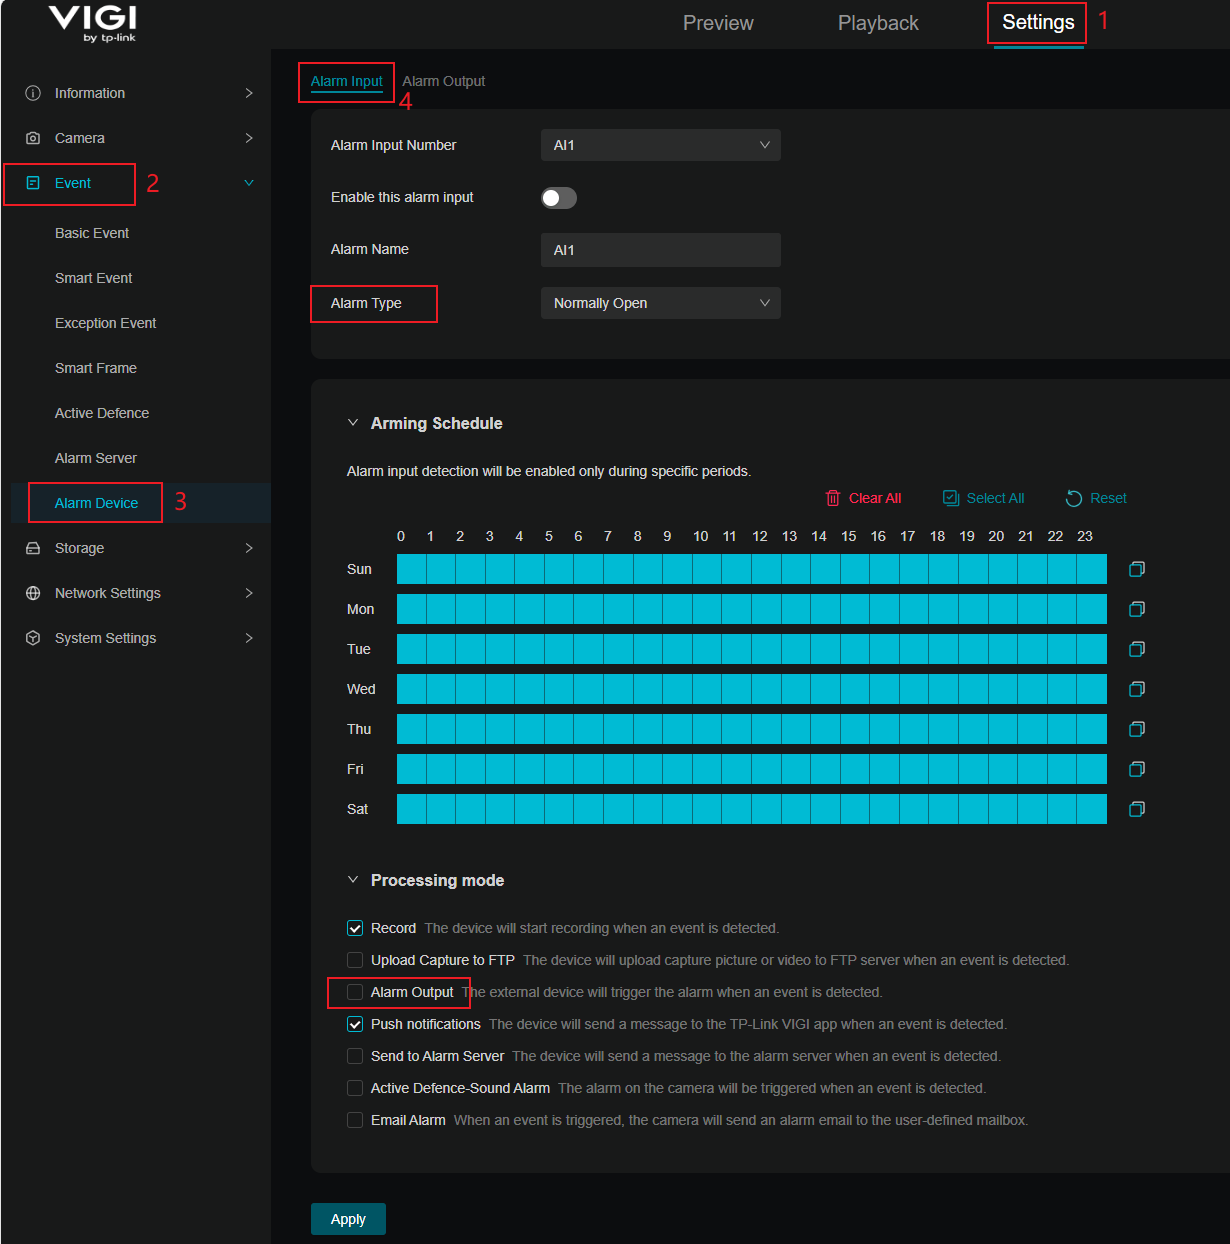
Step 1. Go to Settings > Event > Alarm Device > Alarm Input.
Step 2. Select an Alarm Input Number. Check ‘Enable the alarm input’. Edit the Alarm Name.
Currently, the camera has only one alarm input port, so this option only has AI1.
Step 3. Select the Alarm Type from the dropdown list.
- Normally Open Type means that under normal conditions, the circuit is open and no current passes through the device. When the alarm is triggered, the current passes through the device and the device alarms.
- Normally Close means that normally the circuit is closed, and the device will alarm in case of a circuit fault or alarm trigger.
Step 4. Refer to Set Arming Schedule for setting scheduled time. Drag the time bar to draw desired valid time.
Notes:
- Each cell represents one hour.
- The default setting is 24/7.
- Up to six time periods can be configured for a day.
Step 5. Set linkage methods as needed. If you want to link the alarm output device, you need to check the "Alarm Output" option. The "Alarm Output" option is disabled by default.
Step 6. Click Save.
Alarm Output
If the device has been connected to an alarm output device, and the alarm output No. has been configured, the device sends alarm signal to the connected alarm output device when an alarm is triggered.
Step 1. Go to Settings > Event > Alarm Device > Alarm Output.
Step 2. Select the Alarm Output Number according to the alarm interface connected to the external alarm. Currently, the camera has only one alarm output port, so this option only has AO1.
Step 3. Enable the Alarm Output Device. Edit the Alarm Name.
Step 4. Select the Alarm Duration from the dropdown list.
Step 5. Click Save.

Conclusion
With the steps above, you have successfully set the external Alarm device or Audio device to a VIGI Camera.
Get to know more details of each function and configuration please go to Download Center to download the manual of your product.
คำถามที่พบบ่อยนี้มีประโยชน์หรือไม่?
ความคิดเห็นของคุณช่วยปรับปรุงเว็บไซต์นี้