How to set up set up an IPv6 internet connection on the Archer C3150_V2
For the other models or new GUI, please refer to the FAQ How to set up an IPv6 Internet connection on the TP-Link Wi-Fi Routers
Your ISP provides information about one of the following Internet connection types: PPPoE, Dynamic IP(SLAAC/DHCPv6), Static IP, 6to4 tunnel, Pass-Through (Bridge).
1. Log in to the web-based interface of the router. If you don’t know how to do that, please refer to How do I log into the web-based Utility (Management Page) of TP-Link wireless router?
2. Go to Advanced > IPv6.

3. Select the Internet connection type provided by your ISP.

Tips: If you do not know what your Internet connection type is, contact your ISP or judge according to the already known information provided by your ISP.
4. Fill in information as required by different connection types.
1 ) Static IP: Fill in blanks and click Save.

2 ) Dynamic IP: Click Advanced to have more configuration if your ISP requires. Click Save to save the settings.

3 ) PPPoE: Fill in the Username and Password. Click Advanced to have more configuration if your ISP requires. Click Save to save the settings.

4 ) 6to4 Tunnel: An IPv4 Internet connection type is a prerequisite for this connection type (go to Basic > Internet to check the IPv4 internet connection type.). Click Save to save the settings.

5. Configure the IPv6 LAN settings. Leave the settings as default, and click Save.

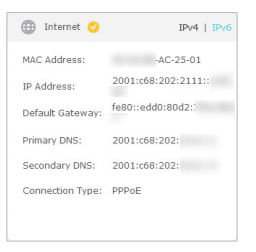
6. Click Status to check whether you succeed or not. The following figure is an example of a successful PPPoE configuration.

Get to know more details of each function and configuration please go to Download Center to download the manual of your product.
Is this faq useful?
Your feedback helps improve this site.
TP-Link Community
Still need help? Search for answers, ask questions, and get help from TP-Link experts and other users around the world.