How to install a VPN on TP-Link Wi-Fi Router(For expressVPN,nordvpn, etc)
Visit the TP-Link website to get the models that support VPN Client.
The VPN Client feature of TP-Link routers allows devices in your home network to access the VPN server provider, without the need to install VPN software on each device.

To use the VPN Client feature, simply configure a VPN connection and choose your desired devices on your router, then these devices can access the remote VPN server. Please follow the steps below:
1. Visit http://tplinkwifi.net, and log in with your TP-Link ID or the password you set for the router.
2. Go to Advanced > VPN Client.
3. Enable VPN Client, then save the settings.

4. Add VPN servers, and enable the ones you need.
a. In the Server List section, click Add.
b. Specify a description for the VPN and choose the VPN type.

c. Enter the VPN information provided by your VPN provider. Please refer to the following text for more details.
d. In the server list, enable the one you need.

5. Add and manage the devices that will use the VPN function.
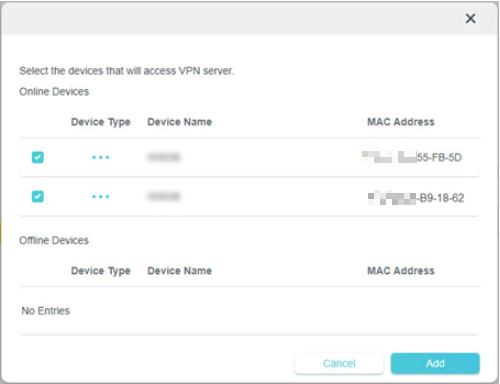
a. In the Device List section, click Add.
b. Choose and add the devices that will access the VPN server you have configured.

6. Save the settings.
Done! Now the devices you specified can access the VPN server you enabled.
If the VPN client feature is not working, please refer to the article :VPN Client is not working
Enter the VPN username and password if required by your VPN provider, otherwise simply leave them empty. Then import the configuration file (less than 20 KB) provided by your VPN provider.
About how to get the configuration file, here is a guide link for some VPN service providers:
How to get configuration files from OpenVPN service providers

Reminder:
VPN Client feature only allows you to update one configuration file. If the OpenVPN servers provide several separate files, please refer to the FAQ Manually create the unified format for OpenVPN profile(CyberGhost OpenVPN Server).
Enter the VPN server address (for example 218.18.1.73) and the VPN username and password provided by your VPN provider.

Enter the VPN server address (for example 218.18.1.73), VPN username and password, and IPSec pre-shared key provided by your VPN provider.
Note: Below is the IKE and ESP supported by L2TP over IPSec client feature:
IKE:
aes-sha1-modp2048,aes-sha256-modp2048,aes-sha384-modp2048,aes-sha512-modp2048,aes-sha1-modp3072,aes-sha256-modp3072,aes-sha384-modp3072, aes-sha512-modp3072
ESP:
aes-sha1, aes-sha256, aes-sha384, aes-sha512, aes-sha1, aes-sha256, aes-sha384, aes-sha512

WireGuard is currently supported only on select models. Please refer to this FAQ:
Is this faq useful?
Your feedback helps improve this site.
TP-Link Community
Still need help? Search for answers, ask questions, and get help from TP-Link experts and other users around the world.


