Recent updates may have expanded access to feature(s) discussed in this FAQ. Visit your product's support page, select the correct hardware version for your device, and check either the Datasheet or the firmware section for the latest improvements added to your product. Please note that product availability varies by region, and certain models may not be available in your region.
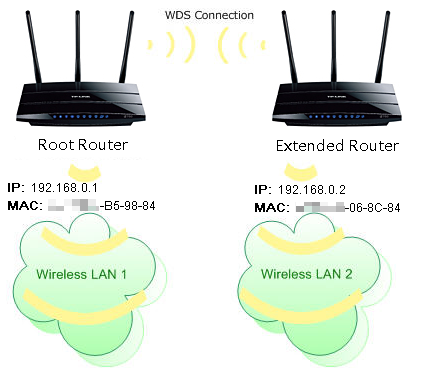
A Wireless Distribution System (WDS) is a system that enables the wireless interconnection of access points in a wireless network. It allows a router’s wireless network to be expanded using multiple access points without the need for a wire to connect them, as is traditionally required.
Notes:
LAN IP of extended router should be different but in the same subnet of the root router;
The DHCP Server on extended router should be disabled;
WDS bridging only requires the WDS setting on either the root router or the extended router, on either 2.4GHz or 5GHz; No need to setup this up on both sides or bands.
Please follow this guide to setup the WDS bridging:
Step 1. Open the web browser and type in http://tplinkwifi.net or the IP of the router (Default it is 192.168.0.1 / 192.168.1.1) to login the Web Management Page of the extended router. The username and password are both "admin". If you are not sure about how to do this, please click here.
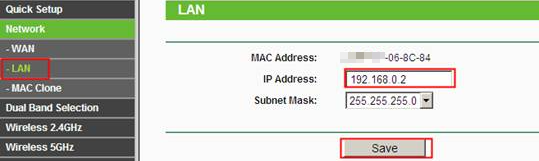
Step 2. Go to Network -> LANand change the LAN IP to a different IP address but still in the same subnet as the root router. Save the setting and reboot the extended router.
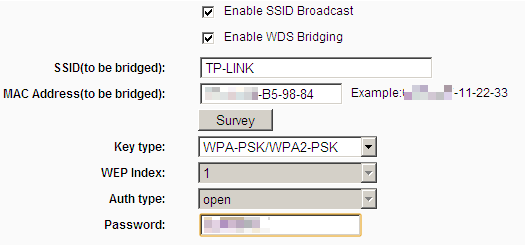
Step 3. Log into the web page with new IP Address. Go to Wireless 2.4GHz -> Wireless Settings. Check Enable WDS Bridging. Then the page will show like below.
Note: Here we use 2.4GHz wireless network as an example, if you want to WDS bridging the 5GHz wireless network, please go to Wireless 5GHz accordingly.
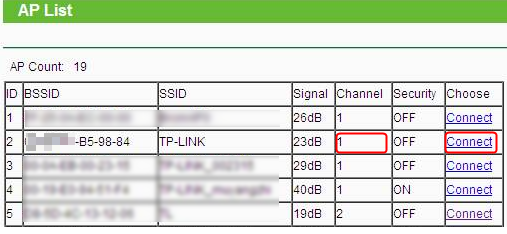
Step 4. Click Survey. On the pop-up window, find the SSID of your root router and click Connect.
Step 5. The root router’s SSID and BSSID have been filled automatically. Then please configure the security settings (Key type and Password) to match the ones on the root router.
Click Save button, then a window will pop out to inform you to change the channel. Click OK, it will change automatically. Please do NOT reboot the router.
Step 6. Go to DHCP-> DHCP Settings page. Select Disable DHCP Server, and click Savebutton and reboot the router.
Step 7. All settings required by WDS function is completed. You can make a simple check by the Ping utility. If the ping proceeds successfully (which means the WDS performs properly), you will see the similar screen as below: (in this example, 192.168.0.1 is the IP address of the root router)
If you want to customize the wireless network please go to Wireless and use a different SSID from your root router.
Get to know more details of each function and configuration please go toDownload Centerto download the manual of your product.
Is this faq useful?
Your feedback helps improve this site.
What’s your concern with this article?
Dissatisfied with product
Too Complicated
Confusing Title
Does not apply to me
Too Vague
Other
Thank you
We appreciate your feedback. Click here to contact TP-Link technical support.
As explained further in our website Privacy Policy, we allow certain advertising partners to collect information from our website through cookies and similar technologies to deliver ads which are more relevant to you, and assist us with advertising-related analytics (e.g., measuring ad performance, optimizing our ad campaigns). This may be considered "selling" or "sharing"/disclosure of personal data for "targeted advertising" as defined by certain U.S. state laws. To opt out of these activities, press "Opt Out" below. If the toggle below for "Targeted Advertising and 'Sale' Cookies" is to the left, you are already opted out and you can close these preferences.
Please note that your choice will apply only to your current device/browser. You must indicate your choice on each device and browser you use to access our website. If you clear your cookies or your browser is set to do so, you must opt out again.
Your Privacy Choices
As explained further in our website Privacy Policy, we allow certain advertising partners to collect information from our website through cookies and similar technologies to deliver ads which are more relevant to you, and assist us with advertising-related analytics (e.g., measuring ad performance, optimizing our ad campaigns). This may be considered "selling" or "sharing"/disclosure of personal data for "targeted advertising" as defined by certain U.S. state laws. To opt out of these activities, press "Opt Out" below. If the toggle below for "Targeted Advertising and 'Sale' Cookies" is to the left, you are already opted out and you can close these preferences.
Please note that your choice will apply only to your current device/browser. You must indicate your choice on each device and browser you use to access our website. If you clear your cookies or your browser is set to do so, you must opt out again.
These cookies are necessary for the website to function and cannot be switched off.
These cookies allow targeted ads or the "sale" of personal data (toggle to the left to opt out).
Analytics cookies enable us to analyze your activities on our and other websites in order to improve and adapt the functionality of our website and our ad campaigns.
Advertising cookies can be set through our website by our advertising partners in order to create a profile of your interests and to show you relevant advertisements on other websites.
Welcome to Our Website! If you stay on our site, we and our third-party partners use cookies, pixels, and other tracking technologies to better understand how you use our site, provide and improve our services, and personalize your experience and ads based on your interests. Learn more in your privacy choices.

.png)
.jpg)
.jpg)
.png)
3.0&4.0-F_normal_1584493102128p.png)